Caramelized Onions
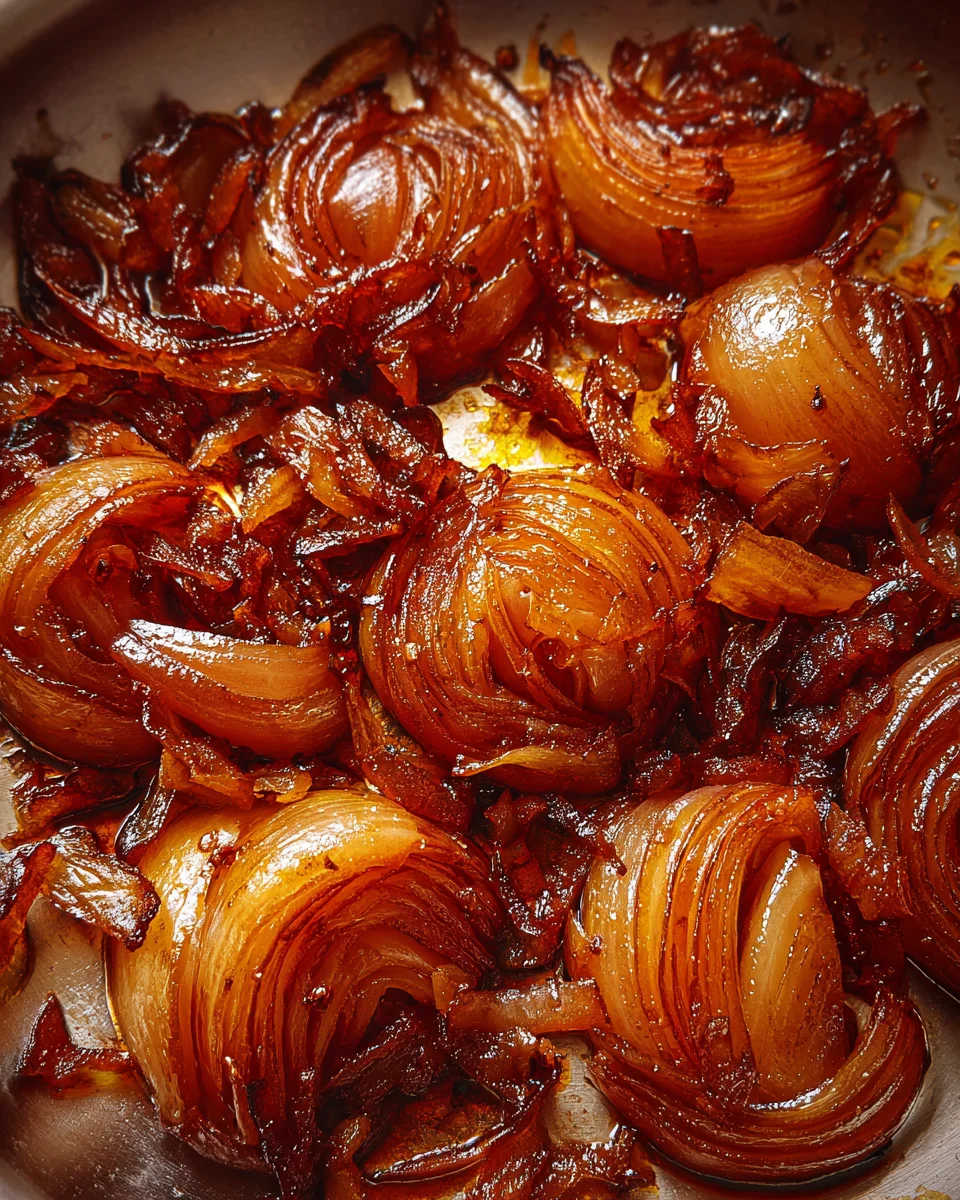
The magic of caramelized onions lies in their deep, rich flavor that elevates countless dishes. Whether you’re adding them to a quiche, a savory tart, or even a comforting bowl of French onion soup, these sweet and savory gems bring a unique taste that enhances any meal. Their versatility makes them suitable for casual dinners or festive occasions, ensuring they are a must-have ingredient in your kitchen.
Why You’ll Love This Recipe
- Simple Process: This recipe breaks down the steps to ensure you can achieve perfectly caramelized onions without fuss.
- Rich Flavor: The slow cooking process develops a sweet, deep flavor that can transform your dishes.
- Versatile Usage: Use caramelized onions in various recipes like sandwiches, salads, and sides.
- Healthy Addition: Low in calories and packed with nutrients, they make a delicious yet wholesome addition to any meal.
Tools and Preparation
To prepare caramelized onions successfully, having the right tools is essential. They will make the cooking process smoother and more efficient.
Grab This Chef Knife Now - Almost Gone!
- Stays Razor-Sharp: Ice-hardened blade keeps its edge longer than ordinary knives
- Superior Grip Control: Unique finger hole design gives you perfect balance and safety
- Built to Last a Lifetime: Premium stainless steel blade with elegant beech wood handle
Customer Reviews ★★★★★
Essential Tools and Equipment
- Large skillet
- Spatula
- Knife
- Cutting board
Importance of Each Tool
- Large skillet: A spacious surface area allows for even cooking and proper browning of the onions.
- Spatula: This tool is perfect for stirring and scraping the bottom of the pan to prevent sticking.
- Knife: A sharp knife ensures you can slice the onions thinly for even caramelization.
Ingredients
To make this delicious dish of caramelized onions, gather the following ingredients:
- 2 tablespoons olive oil
- 3 onions (medium or large, sliced)
- pinch of salt
- 1 tablespoon balsamic vinegar
How to Make Caramelized Onions
Step 1: Heat the Oil
Heat 2 tablespoons of olive oil on high heat in a large skillet. Once heated, add the sliced onions.
Step 2: Cook on High Heat
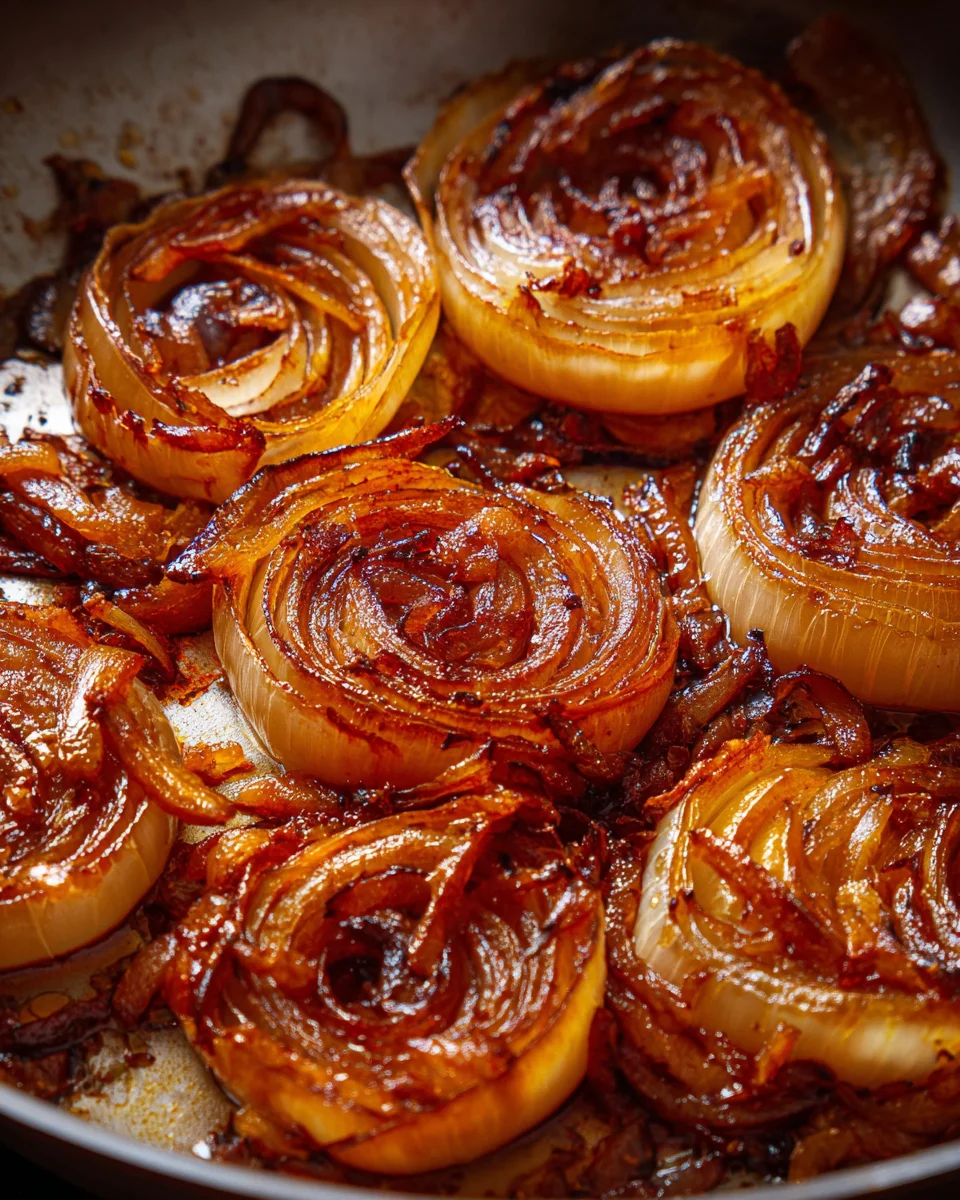
Cook on high heat for about 10 minutes, constantly stirring with the spatula. The goal here is to let the onions start browning without burning them. A few burnt bits are okay as long as most are not charred.
Step 3: Reduce Heat and Add Salt
Reduce heat to medium and continue cooking the onions for an additional 10 minutes. Keep stirring to ensure they brown evenly without burning. At this point, sprinkle a pinch of salt over the onions.
Step 4: Final Cooking Stage
Continue cooking for another 10 minutes on medium or low heat. Stir occasionally to prevent sticking or burning. If necessary, add a little water if they begin to stick. By now, you should have cooked the onions for a total of 30 minutes.
Step 5: Deglaze with Balsamic Vinegar
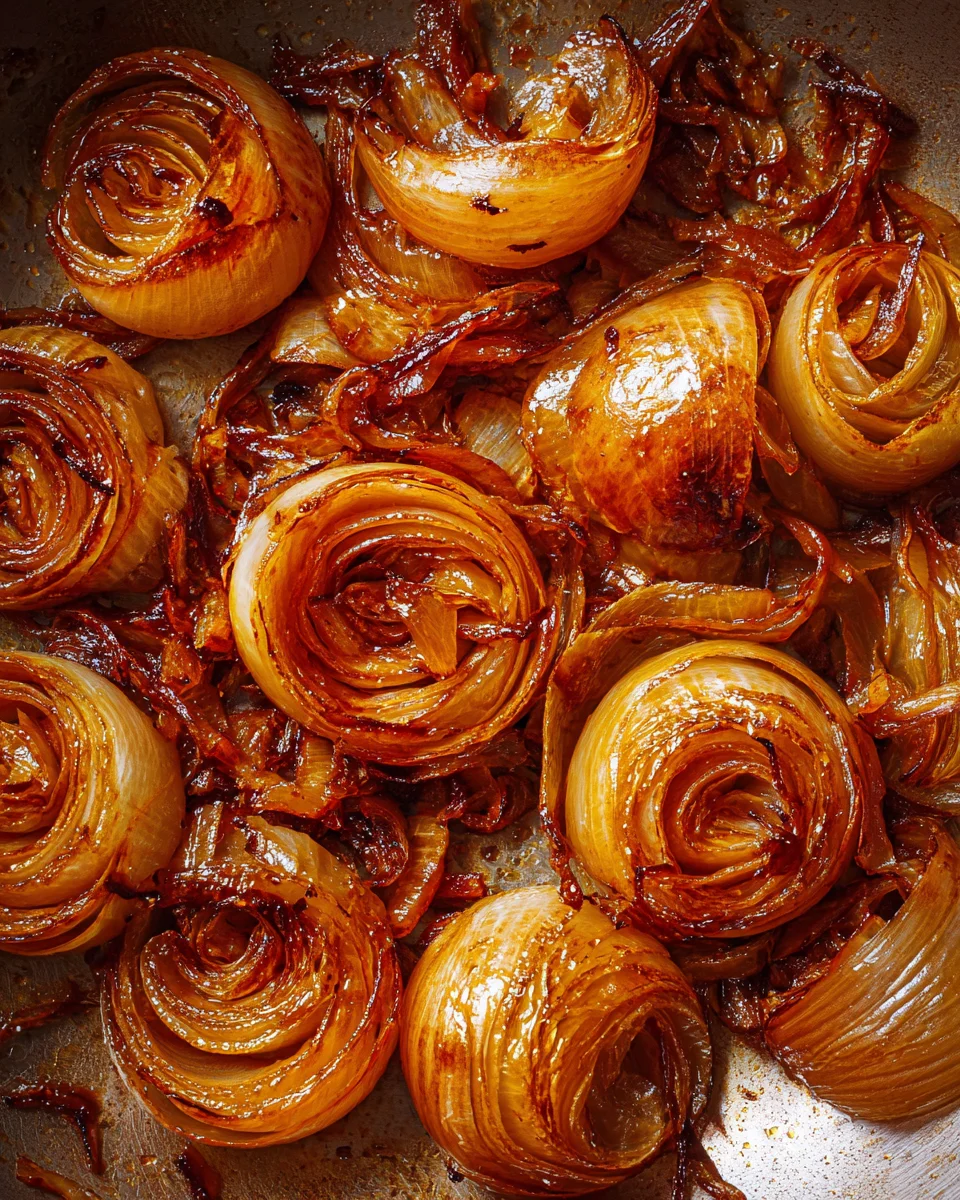
Remove from heat and sprinkle with balsamic vinegar. Use your spatula to mix the onions while scraping up any browned bits from the bottom of the pan until they are well coated.
Now you have beautifully caramelized onions ready to enhance your favorite dishes! Enjoy their sweet-savory goodness!
How to Serve Caramelized Onions
Caramelized onions add a rich, sweet flavor that enhances many dishes. Here are some delicious ways to serve them.
On Top of Burgers
- Juicy beef burgers topped with caramelized onions create a mouthwatering combination.
In Quiches
- Add caramelized onions to your quiche for a savory twist that elevates this classic dish.
With Grilled Cheese Sandwiches
- Pair them with melted cheese in a grilled cheese sandwich for an extra layer of flavor.
As a Pizza Topping
- Use caramelized onions on pizza to add depth and sweetness alongside other toppings like mushrooms or spinach.
In Soups
- Stir them into soups like French onion soup for added richness and sweetness.
Mixed into Pasta Dishes
- Toss caramelized onions into pasta for a delightful contrast to the sauce, enhancing both texture and taste.
How to Perfect Caramelized Onions
To achieve perfectly caramelized onions, follow these essential tips. They will ensure you get that deep, rich flavor every time.
- Use the right onions: Yellow or sweet onions work best for caramelizing due to their natural sugars.
- Cook low and slow: Patience is key; cooking over medium or low heat allows the sugars to develop without burning.
- Stir regularly: Keep stirring the onions every few minutes to prevent sticking and ensure even cooking.
- Add salt early: A pinch of salt helps draw out moisture from the onions, enhancing their sweetness as they cook.
- Deglaze with vinegar: Adding balsamic vinegar at the end adds a tangy flavor while helping lift any browned bits from the pan.
- Experiment with flavors: Feel free to mix in herbs or spices, such as thyme or pepper, to customize your caramelized onions further.
Best Side Dishes for Caramelized Onions
Caramelized onions can elevate many side dishes, making them even more delightful. Consider pairing them with these options:
- Mashed Potatoes: Creamy mashed potatoes topped with caramelized onions create a comforting dish.
- Roasted Vegetables: Add caramelized onions to roasted carrots or Brussels sprouts for an extra layer of flavor.
- Rice Pilaf: Stirring in caramelized onions into rice pilaf gives it a deliciously sweet and savory twist.
- Grilled Zucchini: Serve grilled zucchini slices topped with caramelized onions for a fresh side.
- Polenta: Creamy polenta combined with caramelized onions makes for a rich and satisfying dish.
- Coleslaw: Mix into coleslaw for an unexpected burst of sweetness and depth in this crunchy salad.
Common Mistakes to Avoid
Caramelizing onions can be a delicate process. Here are some common mistakes to watch out for to ensure your onions turn out perfectly every time.
- Heating Too High: Starting with high heat can quickly burn your onions. Instead, begin on medium-high heat and adjust as necessary to avoid charred bits.
- Overcrowding the Pan: Adding too many onions at once will steam them instead of caramelizing. Cook in batches if needed for even cooking.
- Neglecting to Stir: Leaving onions unattended can lead to uneven cooking and burnt sections. Stir frequently for uniform caramelization.
- Skipping Salt: Salt enhances the flavor and helps draw out moisture. Don’t forget to sprinkle a pinch early in the cooking process.
- Not Deglazing Properly: Failing to deglaze the pan can miss out on rich flavors that enhance your caramelized onions. Use balsamic vinegar or broth for best results.
Storage & Reheating Instructions
Refrigerator Storage
- Store in an airtight container.
- Caramelized onions will last up to one week in the fridge.
Freezing Caramelized Onions
- Freeze in a freezer-safe bag or container.
- They can be stored for up to three months.
Reheating Caramelized Onions
- Oven: Preheat oven to 350°F (175°C) and reheat for about 10 minutes until warmed through.
- Microwave: Heat on medium power for 1-2 minutes, stirring halfway through.
- Stovetop: Reheat over low heat, adding a splash of water if they stick.
Frequently Asked Questions
Here are some common questions about caramelized onions that you might find helpful.
How do I achieve perfect Caramelized Onions?
To achieve perfect caramelized onions, use medium heat, stir frequently, and allow patience while cooking. It usually takes about 30 minutes.
Can I use any type of onion for caramelizing?
Yes, you can use yellow, white, or red onions. Each variety will impart a different sweetness and flavor profile.
How long do Caramelized Onions last?
Caramelized onions last up to one week in the refrigerator or three months when frozen. Always store them in airtight containers.
What dishes pair well with Caramelized Onions?
Caramelized onions complement various dishes like burgers, pizzas, quiches, and soups. Their sweet-savory flavor enhances many meals!
Final Thoughts
Caramelized onions are a delightful addition to countless dishes, offering versatility and rich flavor. Whether used in savory pies or as a topping on grilled meats, they bring warmth and comfort to your table. Don’t hesitate to experiment with different seasonings or add herbs to customize this recipe!
Caramelized Onions
- Total Time: 40 minutes
- Yield: About 4 servings 1x
Description
Caramelized onions are a culinary treasure that transforms ordinary dishes into extraordinary delights. Their deep, sweet-savory flavor enhances everything from burgers to soups, adding a rich dimension that elevates your meals. With just a few simple ingredients and an easy cooking process, you can create these golden-brown gems in no time. Whether you’re preparing a cozy family dinner or planning a festive gathering, caramelized onions are the perfect addition to many recipes, making them a must-have ingredient in your kitchen.
Ingredients
- 2 tablespoons olive oil
- 3 medium or large onions, sliced
- Pinch of salt
- 1 tablespoon balsamic vinegar
Instructions
- Heat olive oil in a large skillet over high heat. Add sliced onions.
- Cook for about 10 minutes on high heat, stirring constantly until the onions start to brown.
- Reduce heat to medium and sprinkle with salt. Continue cooking for an additional 10 minutes, stirring regularly.
- Lower heat further and cook for another 10 minutes until the onions are soft and deeply caramelized.
- Remove from heat and deglaze with balsamic vinegar, stirring to combine.
- Prep Time: 10 minutes
- Cook Time: 30 minutes
- Category: Side Dish
- Method: Sauteing
- Cuisine: American
Nutrition
- Serving Size: 1/4 cup (60g)
- Calories: 80
- Sugar: 9g
- Sodium: 140mg
- Fat: 5g
- Saturated Fat: 0g
- Unsaturated Fat: 5g
- Trans Fat: 0g
- Carbohydrates: 8g
- Fiber: 1g
- Protein: 1g
- Cholesterol: 0mg

